Installation prerequisites
Some CircuitPython drivers use I2C and SPI for interfacing so you'll want to get those enabled first. Do this via interface menu in sudo raspi-config - reboot the Raspberry after the successfull configuration. Now, you should have a similar output:
ls /dev/i2c* /dev/spi*/dev/i2c-1 /dev/spidev0.0 /dev/spidev0.1We are going to use pip3 to install packages - it's important that they run in the pip3 and not in the pip environment. The same possible problem applies to python3 / python. To reroute pip / python to the python 3 environment, we add two alias. Once you make the change, re-login or source your .bashrc file:
sudo nano ~/.bashrcalias python="/usr/bin/python3"
alias pip=pip3Test with python --version and python3 --verison if you get the identic and correct output (something with Python 3.x).
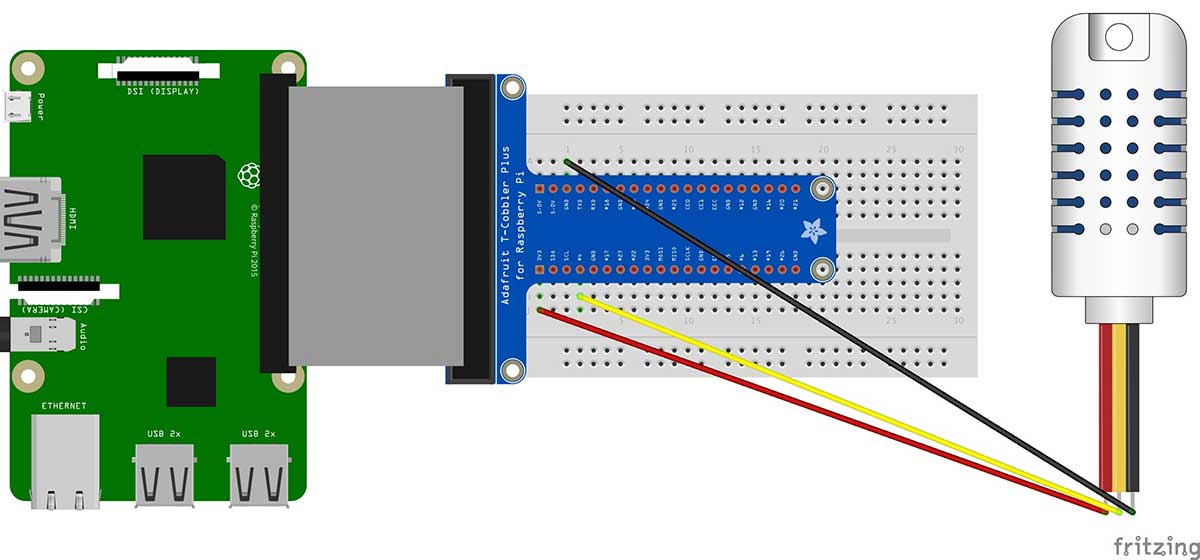
Breadboard setup
For my project, I am using a AM2302 sensor with a Raspberry Pi 3 Model b. The sensor has an integrated resistor. If you use a DHT11 or DHT22 sensor - you need to add the resistor to the broadboard yourself. Please crawl the web for information - I am only covering my AM2302 setup in this guide.
Connect the red wire to 3.3V power supply, the yellow data wire to any free pin and the black to the ground wire. You're good to go!
Installation Python3
Once you have met all the prerequisites, you can install Python3 and the needed libraries.
sudo apt-get install python3 git python3-pip python3-dev
sudo python3 -m pip install --upgrade pip setuptools wheel
Installation Adafruit components
After a successfull Python3 installation, install the Raspberry PI GPIO library followed by adafruit_blinka.
sudo pip3 install RPI.GPIO
sudo pip3 install adafruit-blinka
Test your installation with the following code - paste it in a python file (e.g. blinka.py) and run it from the shell:
import board
import digitalio
import busio

print("Hello blinka!")

# Try to great a Digital input
pin = digitalio.DigitalInOut(board.D4)
print("Digital IO ok!")

# Try to create an I2C device
i2c = busio.I2C(board.SCL, board.SDA)
print("I2C ok!")

# Try to create an SPI device
spi = busio.SPI(board.SCLK, board.MOSI, board.MISO)
print("SPI ok!")

print("done!")
Your output should look like this:
sudo python3 blinka.py
Hello blinka!
Digital IO ok!
I2C ok!
SPI ok!
done!
So far, so good - continue with the Adafruit packages!
sudo pip3 install adafruit-circuitpython-dht
sudo pip3 install Adafruit_DHT
Now everything should be settled for a successfull sensor data call. Create another python file (e.g. sensor.py) and use the following code with some modification to your setup: Sensor can be DHT11, DHT22 or AM2302, PIN is your data-pin number.
import Adafruit_DHT

DHT_SENSOR = Adafruit_DHT.AM2302
DHT_PIN = 4

while True:
    humidity, temperature = Adafruit_DHT.read_retry(DHT_SENSOR, DHT_PIN)

    if humidity is not None and temperature is not None:
        print("Temp={0:0.1f}*C  Humidity={1:0.1f}%".format(temperature, humidity))
    else:
        print("Failed to retrieve data from humidity sensor")
Your output should look like this
sudo python3 sensor.py
Temp=23.5*C  Humidity=51.6%
Congratulations, you've completed the Adafruit_DHT setup successfully :)